Showing posts with label image editing. Show all posts

Tuesday, July 30, 2013

5 Best Mobile Apps For Android Photography

Photographers are in the catbird seat. Camera technology is much more affordable than ever before. Even if you can’t spring for a Hassleblad or Leica, both considered to be the Cadillac status of camera gear, you most likely can afford the camera that lives inside your cell phone.
For the purpose of examining what a smaller budget can buy, mobile devices offer decent quality. Using an IPhone or Android camera phone is advantageous: it takes up very little room and the varied app market is readily available. With a quick download at a modest cost, and in many instances free, apps are ready to use instantly. Add the apps to the cost of a mobile phone (anywhere from $200 -$400) and you can easily enjoy becoming a fully equipped mobile device shooter. Compare that system to a full version of Adobe Photoshop ($489) or even its pedestrian equivalent, Adobe Elements, ($62), and the cost of a camera (from $200 to $7000), it’s plain to see the savings add up. Apps take considerably less time to learn and the phone comes in handy too!
Five awesome apps for mobile Android phones are:
Snapseed: Free! Ten adjustments tools: align, crop, grunge layers, contrast, saturation and vintage effects that can be cumulatively applied.


Instagram: Free! Comes with 20 filters, square format, selective blur.


EyeEm: Free! Rectangular shape format similar to 35mm, adjustment colors, grunge effects, and cropping tool.


RetroCamera: $2.99 Lomography, Polaroid, Pinhole camera, 35 mm film edges and light leaks effects.


Vignette: $2.60 Has numerous settings such as Holga and Diana styles, Instant camera, retro, film grain, pastel colors, light leaks, colored filters, soft-focus, monochrome, b&w, filter intensity, self-timer, time lapse and customizable filters settings.
All of the above apps have share capability. Since all the editing is done in the device, users can quickly share to Facebook, Twitter, Tumblr or app specific galleries. 

EyeEm for example, has periodic meet-ups within certain cities. You can create your own meet ups and start a photo live event. Part of the fun of photography is sharing works, and the affordability factor is consumer favorable. Here’s to making art – and being snap hAPPy!

Friday, July 26, 2013

New Kid On The App Block

Instagram isn't the only kid on the app block. I recently started using the EyeEm app and what I like best about it is the use of the rectangular frame. It reminds me of 35 mm, albeit a bit longer and narrower.

I am still in awe over the quality of images the Android takes. The ease of use factor is phenomenal. Combine that with being able to tweak on the run is what makes apps so appealing. EyeEm has similar filters that Instagram has such as vintage, b&w, and a set of processed color filters that range from a cyanotype effect to a faded light effect. In addition to color shifting, EyeEm has a grunge effect which gives the image an antique feel.

The danger to using too many creative filters is the image then becomes more about the process than about the content. Many critics might argue phone photography isn't as serious as that coming from a camera. I think capturing a scene with a mobile device doesn't have any less intent than that of one made from a camera.

Photography isn't inherently serious or not. It's a technical process whereby the tool is the one you happen to have. Yes, indeed the fancier the lens the better the image quality, but where visual reference is concerned today's mobile phone devices do a decent enough job when the user familiarize themselves with the feature of that device.

Ben Lowry, a pro photojournalist, uses apps to accentuate images. Lowry employs mobile photography for documenting life in Sarajevo and uses the Clara filter from the EyeEm app. Lowry states the Clara filter is "Best for shooting outdoors in sunny conditions."

Using apps with digital photography is analogous to knowing the difference between film ratings of ASA 100 to ASA 800. The app is a setting of sorts just as the film speed must be appropriate for each specific light scenario. Photography is all about technique even when the technique is that of additional editing to the original source file.

The following images were taken on a Motorola Android paired with the EyeEm app:


Friday, June 14, 2013

Layers Are Not Just For Cake: How to composite images

No matter what field you specialize in, the tools you use to help you do your job are valuable. For a photographer the tools are aplenty but it wasn't always that way. Before digital cameras and Adobe Photoshop, a photographer needed a good understanding of exposure in order to produce a good print. No matter the equipment, it's always the user and their level of expertise that will yield the best results!


Image #1
Image #2
There's a two sided conversation about technique in photography. Too much technique and a photo becomes more about process than what a 'true' photograph is (or should be). Photography is a process. Any enhancements tools help rather than hinder an image. The only exception to those terms is documentary photography. When photography is used for reporting purposes, the images should be as accurate a recording of the subject as possible.

For creative purposes, beauty is in the eye of the beholder. To make enhancements to one plain image I'll composite it with a second image using Adobe Photoshop. The two images combined will result in one final 'artsy' image.

Step 1: Select two images. One should have some texture to it to create interest.

Step 2: Using Photoshop open both images using (File | Open) commands from the menu bar. Check the image size of each file to make sure the resolution is the same for both via the (Image | Image size) from the menu bar. If resolution sizes are different choose the file that has the larger file size and size to match the smaller of the two.

*Note: if you intend to print the final file, as opposed to
displaying it on web platforms, make sure the resolution is at least 150 pixels per inch for a up to 8x10 print. If a bigger printout is desired use 300 pixels per inch. Most digital cameras have file size settings to select large for larger source files.

Step 3: With one image selected, go to select all function under Select on menu bar. Then copy it (Edit | copy) and paste the selection onto the other image (Edit | paste).  The result will be two layers on one file. 

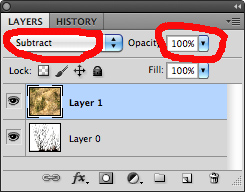
Step 4: Open the Layers tab under Windows from menu bar. Select one of the layers by clicking in one of the boxes. Whatever box is highlighted in blue is the active layer.  Play with the adjustment choices for each layer by choosing from the drop down menu until you find something you like.

For the selection of adjustments to the grass image Subtract looked the most interesting.

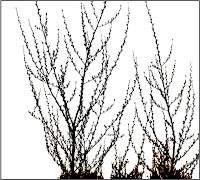
On the right of the Adjustment drop down menu choices, an opacity bar allow for further levels of adjustments. The Subtract choice made the brown color blue and reminded me of 'Starry Night' by Vincent van Gogh. The grass image looked like etching against the white space from the tree image.

Step 5: Inspired by the color blue and the idea of 'Starry Night,' I created the yellow moon burst. For this last effect create a new layer by clicking on the far right arrow adjacent to Layer in the Layers window. A pop up window will appear and select create new layer. For simple shapes go to the perforated rectangle on the tool bar and hold it down until it changes into the elliptical marquee tool (oval). Press and drag the oval tool onto the new layer. Go to the tool bar and double-click the left box on the bottom to activate a color picker. Select a color to fill the oval shape. I chose yellow to match the feeling of a yellow moon. To fill the shape with the selected color, go to (Edit | Fill) and the shape fills with the color! To create a crescent shape, create another layer with a second oval shape. Use that second empty oval and position it over the first oval and cut out part of the first shape using (Edit | Cut).

You can continue to explore different effects and levels of adjustments. Once you are happy with the results, it's best to 'flatten' the layers. This collects all the separate layers and condenses the files size. To do so, go to the Layers tab and scroll down to (Flatten | Image).

The resulting image looks nothing like either of the two separate shots but serves as example of composting more than one photograph with others to create something entirely unique.

The possibilities are varied depending on how many images and layers are used combined with adjustments for each element.

'Starry Night' Vincent van Gogh
The idea is to have fun and explore the process! Don't be intimidated by the software.

Like any new tool you've never worked with before, the more you explore the PhotoShop program, the more you'll see what the editing features have to offer. It's through practice that a user learns the tools. One final word, always save the new image with a different name.  This preserves the original file info in case you wish to use that again. Think of the original file as though it were a negative. You wouldn't want to destroy the source. The new files should be a work in and of itself.

What I most liked about this image was the color blue. It reminded me of Gogh's work. Think how a classic artwork would look if it were done using Photoshop.